Vegan & Gluten-Free Halloween Brain Cake
celine ikelerShare
I was totally inspired by a french blogger and her amazingly beautiful photos of this brain cake. I chose to use the brain as a topper for a tiered white fondant cake with slashes cut into the fondant and blood running out and down the sides. It turned out very cool … maybe a Zombie Wedding cake..? i don’t know, something cool like that. For me it was just for Fun… a Halloween cake contest.
I grew up in Canada and took French since Kindergarten, so luckily, I could get the gist of her instructions… and now here they are for you. She used a marshmallow fondant and injected it through a tube to get the brain coils, but it’s pretty easy to roll out vegan fondant in to a snake-like. Marshmallow is either egg whites, or animal gelatin. Neither are ok for me in any regard, so I used easy to find, vegan fondant.
I baked up 2 6′ red velvet cakes, layered them with frosting and chilled until it was solid and carvable. for Brains, they are a flattish dome, cut the cake to about 4″ tall and round out the corners to make it brain shaped. it’s ok if it’s not totally symmetrical or perfect. you can fix that later.
Apply a thin, crumb coating of frosting to the cake and chill about 15 minutes. Add another thick layer of frosting to make the cake smooth on the top and sides, using the frosting to enhance the shape you’d like, again tho, it’s ok it’s it’s not perfect. the thick frosting will allow you to push the fondant into the shape you want.
Color your white fondant with a touch of red dye or beet powder coloring. You just want a very light color, since the blood layer will color it further.
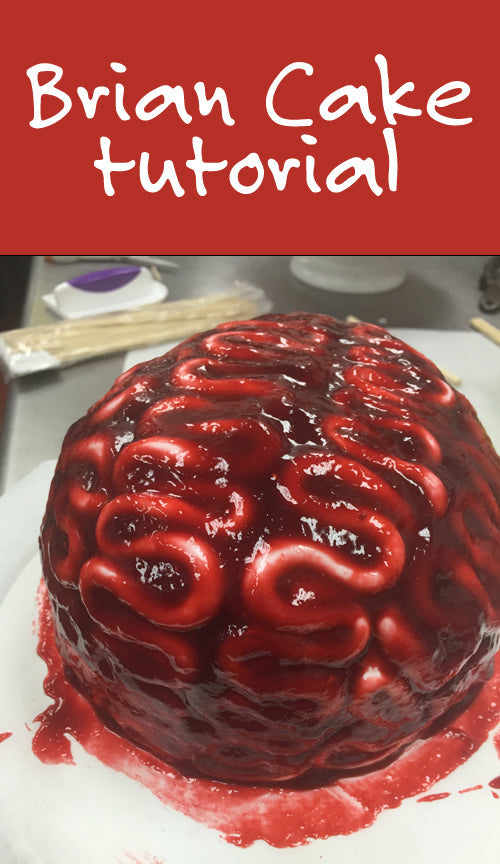
Roll into snake coils about 2 ft long and 1/2″ thick. begin at the center “front Lobe” and coil back and forth until you get to the other side of your brain. if you run out of coil, just tuck the end in the frosting and start a new coil. you wont see the gap later on. Continue coiling on the sides, up and down and around to create a random design. you want to stress the center gap coil that runs down the middle more than anything else for realism.
Once the fondant lobes are complete, using clean, dry hands, press the fondant gently into the shape you want. A bit flatter on the top and sides, rounded on the edges.
this is your finished brain.
Chill for about 30 minutes to get the frosting set. Bring it out and let the fondant dry an hour or so.
Now the fun bloody bit!
Take 2 cups of seedless raspberry jam and warm in the microwave for 1 minute, stir until it’s very smooth and flows easily. A few brands that i used varied in color, so if you don’t want to add food coloring to it, get the reddest jam you can find. Making your own really is the best tho.
<a href="https://enlightenedbaking.files.wordpress.com/2015/10/img_2655sml.jpg"><img class="alignnone size-medium wp-image-56" src="https://enlightenedbaking.files.wordpress.com/2015/10/img_2655sml.jpg?w=600&h=450" alt="IMG_2655SML" width="300" height="225" />
</a>
When the Jam has cooled enough to touch, but is still warm, spoon it on the cake and help it in to the holes between the coils. when it’s completely covered, use your fingers to smooth it in a thinner layer across the coils. so they show through a bit. Allow to cool and the jam will solidify again. Brilliant huh?!
Happy Halloween!
</div>